

How To Make A Bow Drill Fire Set
How to Make a Bow Drill Kit (Complimentary Carving Template)
How to Make a Bow Drill Kit : Introduction
How to Make a Bow Drill Kit is ane of the skill-sets I am most proud of. There are few events in my life that I will never forget. Spinning out my first glowing, reddish-hot bow drill ember is one of them. At that place is something truly magical about the experience of rubbing ii sticks together and creating fire. Without getting besides philosophical, carving and using a bow drill kit takes us dorsum in time. It connects the states to our distant ancestors who walked the earth thousands of years agone. When we brand burn from the most basic of natural tools, we can't help but wonder what information technology must have been like to depend on such primitive engineering science for warmth, cooking, protection and our very survival.
How to Make a Bow Drill Kit: The Components in the Bow Drill Kit

To sympathize How to Brand a Bow Drill Kit, yous must understand what function each component in the kit performs AND what types of wood/material they should be made from. We'll start with the two most important components of any bow drill kit: the spindle and hearth board.
How to Brand a Bow Drill Kit: SPINDLE & HEARTH BOARD
A string and bow are used to rotate the spindle into the hearth lath. The fast-rotating spindle generates a fine dust at the point of contact with the hearth lath. As this dust collects (and friction heat builds) it will develop into a smoldering ember.

Although I have successfully used many different types of wood for spindles, certain varieties piece of work best. While I want y'all to be familiar with specific copse and plants that make excellent spindles, it's important that you first empathize their central properties. Soft and lightweight wood are preferred over difficult and dense varieties. A popular rule of thumb is that you lot should exist able to utilise your fingernail to brand an indentation in the wood with little endeavour. While soft is preferred, the wood should not exist "punky" or rotted. It should be firm. Whatever wood you choose should be equally direct as possible and gratuitous of knots or cracks. Finally, it should be Os Dry out.
Specific Wood Species for making a Bow Drill Kit
Below is a listing of tree/plant types I dear to use for the Bow Drill Hearth & Spindle. While in that location are others that work, I find these to be best for beginners.
-
Basswood (American Linden)
-
Cottonwood
-
Eastern White Cedar
-
Alder
-
Sycamore
-
Willow
-
Staghorn Sumac
-
Aspen
-
Tulip Poplar
-
Yucca (dead dry centre woody flower stem)
-
Sotol (dead dry center woody flower stalk)
-
Elderberry (Sambucus)
-
Mullein (dead dry eye woody flower stalk)
For a very detailed article virtually the All-time BOW DRILL Forest (with photos), see the one I wrote here: https://willowhavenoutdoor.com/burn down/best-wood-for-bow-drill-how-to-cull-the-perfect-wood-for-your-friction-fire-bow-drill-kit/
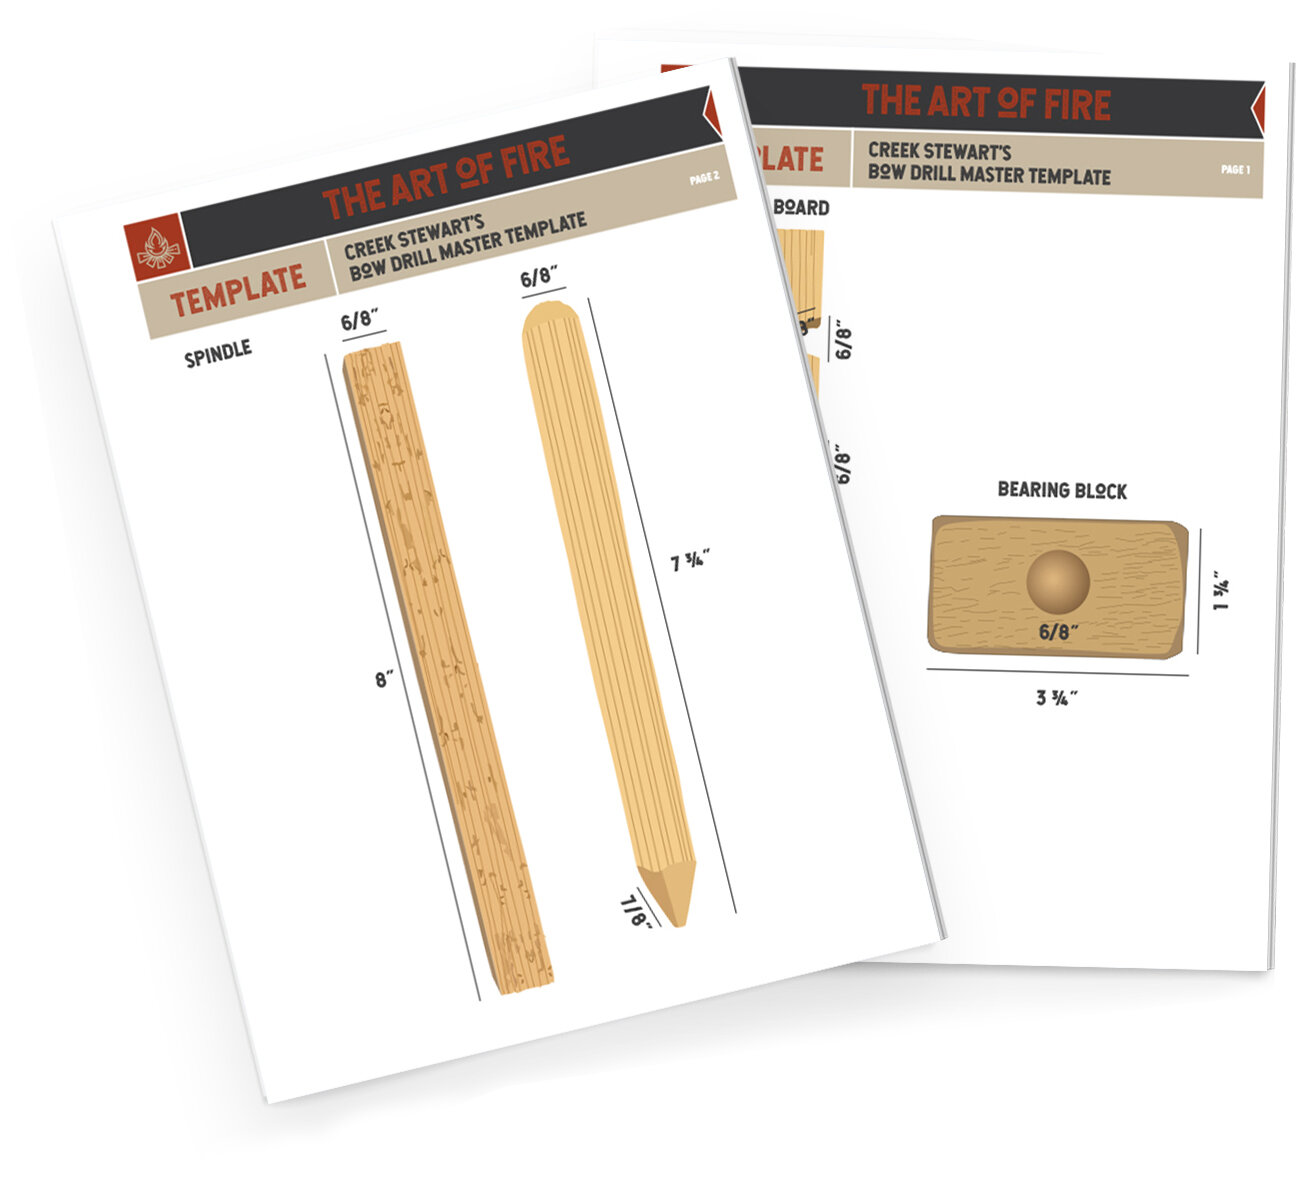
In my experience, the best length for a bow drill spindle is 8 – 10 inches. The diameter should exist similar to that of your thumb—, roughly half an inch to an inch wide. It should besides exist straight and complimentary of knots, cracks, bawl, and forks.
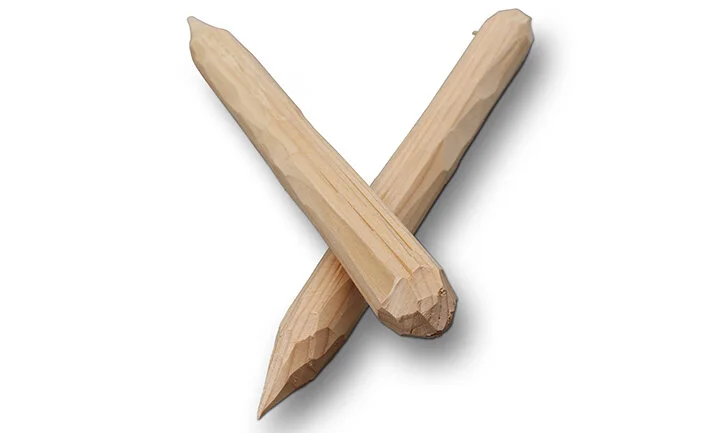
The spindle needs to be circular. If a carefully selected straight branch is used, very little carving may be required along the length. Yet, if the spindle must be dissever from a larger piece of stock so information technology must be carefully carved into a circular, dowel shape. If a piece of stock at least 2 inches in diameter can be sourced and then information technology tin exist split in half; i side volition serve as the spindle blank and the other as the hearth board.
One end of the spindle should exist sharpened like a pencil (this won't be possible with stock that has a pithy middle). The other end should be rounded, like the end of a hot dog. Try to get in equally perfectly round every bit possible. Information technology won't work if it is flat or jagged in whatever way.
This video is a great sit-in of BOW DRILL TECHNIQUE.
The sharp finish will be the top of your spindle. This is where pressure is applied from the hand-held bearing block. The top is sharpened because you desire as piddling friction as possible. The to the lowest degree amount of forest spinning against the bearing block, the improve. The rounded terminate is the business concern end of your spindle. Information technology moves against your hearth board, where you want as much friction and surface area on the board as possible to increase rut.
Like the spindle, the hearth should also exist straight and complimentary of knots, cracks, bark, and forks. Hearth boards perform all-time with soft forest that are between one-half an inch and three-quarters of an inch thick. The length of the hearth lath can vary greatly, but around 12 inches is ideal. The ideal width of a hearth board is 2 inches or greater, although I've used boards many times that are about the same width as the bore of the spindle. The hearth must be flat on both sides so it can rest securely under i'due south foot and on the ground. A hearth board that is not flat may rock or twist while you drill, which is a mutual rookie mistake.
How to Make a Bow Drill Kit: BEARING BLOCK

The bearing block is held in the palm of the driller's non-dominant hand to provide downwards pressure on the spindle equally it spins into the hearth board. Since y'all want the friction to occur in the hearth board and not the bearing block, measures must be taken to reduce friction between the pointed spindle tiptop and the recessed divot on the underside of the bearing cake where the spindle summit fits.
An ideal bow drill bearing block is cut from a round of very difficult (and preferably live) green forest. Remember, you want the top of the spindle to rotate with as little of friction as possible in the bearing block divot. A soft, dry bearing block volition only cause the top of the spindle to heat up and fume at the point of contact. The bearing block has no reason to be dry or soft. In fact, it performs best when moisture, slick and difficult.
How to Make a Bow Drill Kit: THE BOW

The bow, when fitted with a bow string, allows you to rotate the spindle. When the spindle is wrapped on the bow string, a pushing and pulling of the bow causes the spindle to turn with impressive velocity, creating the friction you need to go a hot, glowing ember. The bow offers a mechanical advantage for rotating the spindle much faster than if you lot were to rub the spindle betwixt your hands, and information technology takes a lot less energy.
When learning how to brand a bow drill kit, the bow should be approximately the length of your fingertip to armpit. It should exist cut from either green or seasoned wood approximately 1-inch in diameter. Expect for forest that is very sturdy and solid. Many people presume it should be flexible, like the kind of bow you use to shoot an arrow, just that is not true. Yous really don't desire the wood to flex at all. I prefer a bow that has a slight bend to it, like to the shape of a parenthesis "(". I've as well used most straight bows on many occasions, merely kickoff-time success rates seem to be a petty college with curved bows.
Like near of the other bow drill components, the bow should be costless of knots, branches and cracks.
A functional bow shouldn't require much knife work. At near, two string notches will need to be carved. A advisedly selected bow with a pocket-size y-fork at peak will eliminate the need to cleave ane of them.
How to Brand a Bow Drill KitL BOW DRILL Course, TECHNIQUE AND PROCESS
Once all of the components are nerveless, processed, carved, and prepared, information technology's fourth dimension to assemble your burn-making kit. The post-obit steps are right-handed instructions. For left-handed drillers, simply switch the words RIGHT and LEFT from here forward.
Pace i: Carve the Seat Divot

Before you start rotating the spindle y'all will demand to cleave a small, rounded depression in the hearth lath. This is where the rounded end (bottom) of the spindle will sit. Without a seat divot it's extremely challenging if not incommunicable to keep the spindle turning in i place when drilling begins.
The seat divot should be carved approximately 2 inches in from the correct side of the hearth lath and 1-inch dorsum from the front edge, as shown in the illustration. Information technology should be at almost a quarter-inch deep and close to the same diameter as the bottom of the spindle.
Step 2: Fire in the Seat

Now you are ready to spin the spindle against the hearth board, but your goal in this step is non to achieve an ember. You are simply burning in a better seat in the modest divot that you lot carved in Step 1.
With your spindle wrapped and your hearth board on apartment, solid basis in front of you, place your left foot on the hearth lath and crouch downwards. Put your right knee joint on the ground. The carved divot on the hearth board should exist on your right side and facing away from you.
Now pick up the bearing block in your left mitt. Your left hand will come up effectually in front of your left knee and shin and the bearing block will exist used to utilise downward pressure level on the wrapped spindle, holding it deeply into the carved seat on the hearth board.
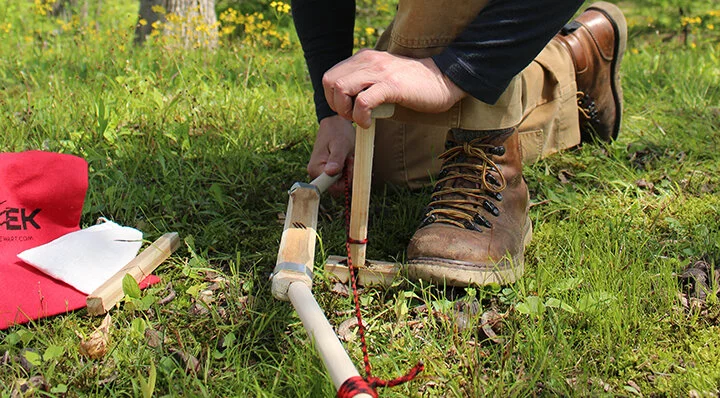
Pinning the wrist on the forepart of the shin.
As yous feel more comfortable, increment speed with the bow. Exist sure to apply the unabridged length of the bow string, cartoon it all the fashion to the front end and all the way to the dorsum. The bow is your mechanical advantage. Use IT. As you increase bow speed, apply slightly more force per unit area on the bearing block.
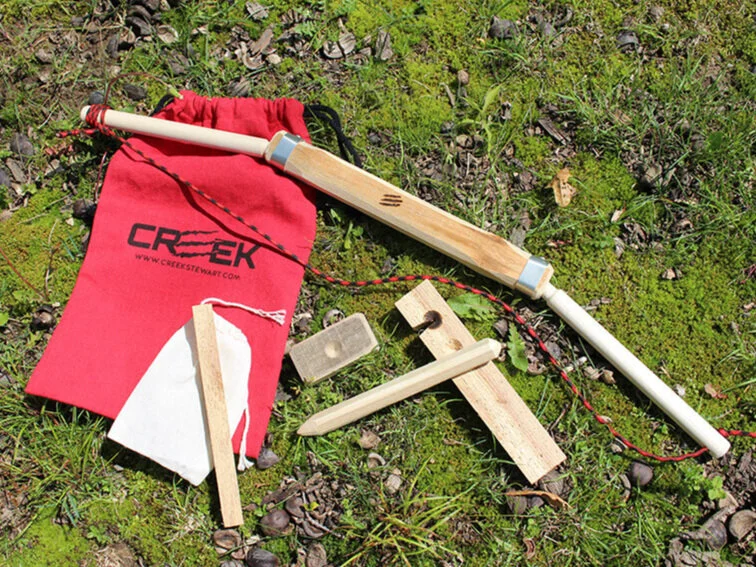
BUY my Have-Down Bow Drill Kit right now. CLICK Here
Includes:
-
Have-Downwards Bow
-
two Spindles
-
Hearthboard
-
Bearing Cake
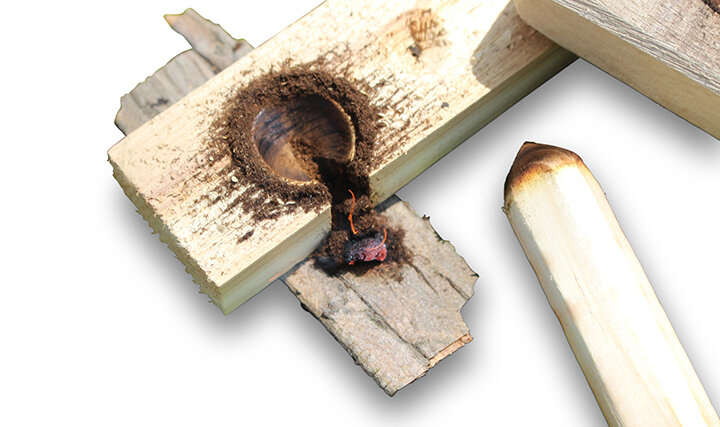
If yous've chosen your materials properly you will start to smell and see smoke within 10 – fifteen passes of the bow. You'll also notice a modify in feel and sound as your spindle begins to char and fire the divot in your hearth board. Once your kit starts to smoke, continue for 5 more passes and so stop.
Step iii: Carve the Hearth Board Notch

As the spindle rotates against the hearth board it creates a fine, charred dust. You'll encounter information technology at this bespeak in the procedure if you look closely. When you're trying to attain an ember, this grit will ultimately become your ember as the temperature increases enough to ignite it into a smolder. At this indicate y'all need to create an area on the hearth board to collect and comprise this charred wood dust. You can do this past carving a pie-shaped notch into the center of the freshly charred hearth lath spindle seat.
The tip of the notch should extend to the exact middle of the charred circle. It should exist cut all the way through the hearth board and should be cleared of shavings, splinters, or whatsoever debris that would interfere with char grit collection.
DOWNLOAD MY Complimentary Bow Drill Carving Template
Footstep iv: Go for Ember
With a proper charred seat burned in and the ember take hold of in place (something flat placed under the notch), information technology'due south now time to go for an ember. Reset equally before. Don't forget to brace that wrist! Also, you need to have a tinder bundle at the ready earlier proceeding. Follow the steps below:
-
Position the kit; spindle in bearing cake and on hearth board. Left wrist should be braced against front of left shin.
-
Start to push button and pull the bow, slowly at first to build a rhythm.
-
Use the full bow, cartoon it all the way to front, all the way to dorsum.
-
Begin to speed up. After 10-15 passes the kit will commencement to smoke like before. You lot should start to meet a trivial dust begin to collect in the notch.
-
When your kit starts to smoke, push button and pull the bow faster and employ a petty more downward force per unit area with the bearing block. Be sure to keep the bow PARALLEL with the ground so the bow string doesn't ride up or downwards the spindle. Continue for 10-15 more passes.
-
IF ANYTHING DOESN'T FEEL Correct, Cease, Conform AND RESET.
-
By now, you should run into quite a bit of dust collecting in your notch. It should be light-to-dark dark-brown in color. You need it to be dark-brown-to-black in color.
-
Now, for 5 – 8 seconds, push and pull as fast every bit you tin, giving it all you have, while maintaining steady downwardly pressure with the begetting block. Y'all will see dust pouring into the notch and darkening in color. Then slowly stop and remove the spindle.
How to Make a Bow Drill: CONCLUSION

Bow Drill ember waiting to be placed into tinder bundle and blown into flame
In my experience, once a student has tried and failed at the bow drill three times in a row, the success charge per unit drops significantly. If you lot try for an ember three times and don't get information technology, take a interruption and endeavor again after you've had time to rest, catch your breath and decompress. During that fourth dimension, reevaluate your kit or carve a new one. So give it another shot.
How to make a Bow Drill Kit and fire from sticks one of my greatest life accomplishments. It has taught me much about burn principles and my ain personal capabilities and limitations. I promise you, too, will add the bow drill to your list of survival skill sets. I besides hope that the bow drill is merely the beginning in your friction-fire adventures.
Remember, it's not IF but WHEN,
CR///EK

How To Make A Bow Drill Fire Set,
Source: http://www.creekstewart.com/creek-stewart-survival/how-to-make-a-bow-drill-kit
Posted by: baynesficeffloved.blogspot.com
0 Response to "How To Make A Bow Drill Fire Set"
Post a Comment